

Building your very own cloud dailies app from scratch with AVflow
This post was originally published on Medium by Seth Goldin.
Nowadays, production and post-production are distributed all over the world, and enterprising post-production teams are constantly looking to tweak and refactor their workflows so that each creative can just sit down and get right to work.
There are a handful of great apps and services around today that can move media around, but many technically-inclined post-production professionals don’t realize that building a custom app is within reach.
This post is a sketch of how someone might spin up their own dailies tool to accelerate workflows from production to post-production.
We can use AVflow to glue together a documentary workflow, in which a DIT uploads some camera files into an S3 bucket, and then H.264s copies of those files, along with automatically-generated captions, land into a review app, powered by Mux.
AVflow is a platform that glues together various APIs specialized for audio and video. In the past, it might have taken a talented developer a few weeks to pore over the sprawling documentation from assorted APIs and carefully write, test, and deploy some code. Now, with AVflow having collected these APIs under one roof, it’s possible to whip up a back end for a video app in a matter of minutes, with just a GUI, and no code.
Under the hood, AVflow would be gluing a few different services together:
- A DIT from set uploads some camera files with an audio scratch track into an S3 bucket
- AVflow, watching for a particular folder, transcodes the camera files into H.264/AAC preview files via the encoding.com API, into an acceptable format for Rev.ai. Rev.ai is a platform that can ingest audio files, perform speech recognition, and spit out a transcript.
- The H.264/AAC files are sent to Rev.ai and are transcribed via machine
- AVflow converts the resulting JSON file from Rev.ai into an SRT file
- Both the H.264 files and SRT files land into Mux for use in the app. Mux Video is an API from the Mux platform, to where you can ingest your videos. When you connect the Mux API to your app, Mux can handle everything on the back end with storage, DASH or HLS, etc.
The front end could be constructed via something like Bubble, and the H.264s and the SRTs would land into Mux Video, for use inside the app.
Connecting S3 to AVflow
AWS account setup
First, create an AWS account, and lock console access for the root account down with MFA.
Decide on a region that makes sense for you, and then create an IAM user with permissions to read and write to S3. Your requirements for how you might want different users locked down to different buckets or folders may vary.
S3 client
For the more technically minded, the AWS CLI is a great free and powerful interface to access AWS, including S3. For users who prefer a GUI, I like ExpanDrive.
Log into the client
Using the AWS CLI, let’s log in with the programmatic security credentials:
$ aws configure
Enter the AWS Access Key ID, AWS Secret Access Key, Default region name, and you can enter text for the Default output format.
Make a bucket
Make a bucket:
$ aws s3 mb s3://avflow-demo-1
Specify where the media should go in AWS
First, in the bucket, we’ll want to specify where the source files from the camera should be uploaded. This folder should already be created before the flow in AVflow is first run, because AVflow will watch for incoming media files as they are ingested. So let’s get the folder ready.
Nota bene S3 does not have actual folders, like what you would use on desktop file systems; folders are actually just shared prefixes for organizational purposes. So there’s no need to create a folder in advance, but just recall what “folder” you’ll want to use when it’s time to ingest your media into the S3 bucket, because we’re specifying this in the flow. Here, let’s use source-prores.
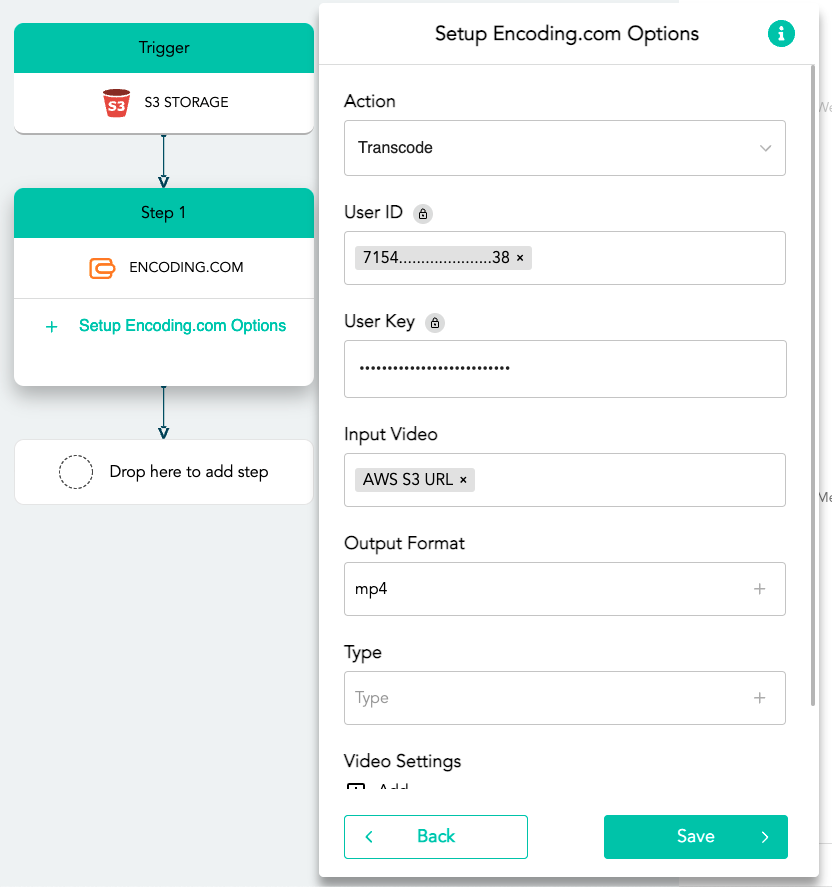
Transcode source files for Rev.ai
Before sending off footage for transcription, we’ll need to transcode our ProRes files into codecs suitable for Rev.ai’s system. According to Rev.ai’s documentation, “For best results, use a lossless format such as FLAC or ALAC, or a lossy format like MP3 or AAC with a bitrate of 192 Kbps or above.” Let’s use AVflow’s integration with encoding.com’s API to transcode our ProRes clips to H.264/AAC wrapped in MP4.
The mechanics of the encoding.com step
For an encoding.com step, we’ll use our User ID and User Key from our account, and we’ll choose choose AWS S3 URL for the Input Video, since we’re pulling our source ProRes files from the S3 Storage trigger. Selecting mp4 as Output Format will pass our WAV audio in a MOV container into AAC, which can be used for Rev.ai.
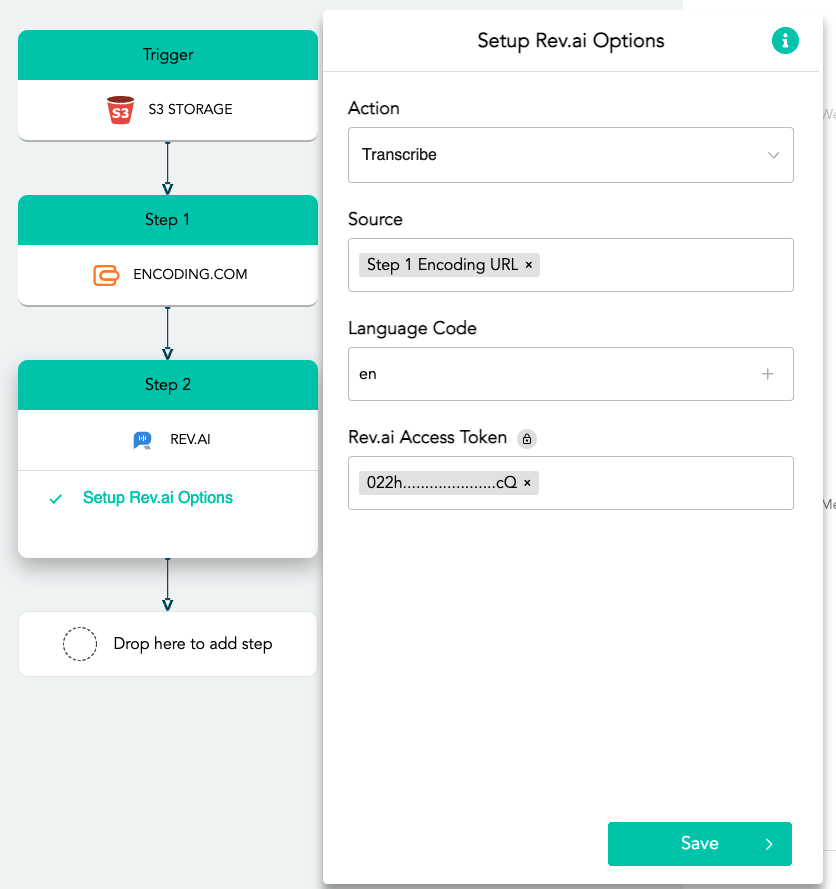
Send audio files into Rev.ai
After the files are transcoded into the H.264/AAC format, we’ll have them go into Rev.ai to be transcribed.
First, we’ll log into Rev.ai, and then we’ll go generate an access token.
We’ll use en for English, and the source will be the file from our Pro Transcode step, in this case, Step 1 Encoding URL, and we’ll put in our Rev.ai access token.
Convert the JSON file from Rev.ai into an SRT
The output of the Rev.ai step will be a JSON file, so we’ll need to add a Subtitle step to convert that JSON file into an SRT file.
- Action: Subtitle
- Format: SRT
- Ratio: Ratio
- Full Stop Symbol: .
- FPS: 23.976
- Time Code: 00:00:00:00
- Source: Step 2 Transcribe URL

Send to Mux
Lastly, we’ll have two separate steps to send into Mux, the video output from the step that transcoded the ProRes to H.264, and the SRT output from the step that converted the JSON to SRT.
Now you have H.264/AAC files and the SRTs that you can pipe into your app via Mux. These URLs could be sent to Mux and your front-end app, in just two more Mux steps.
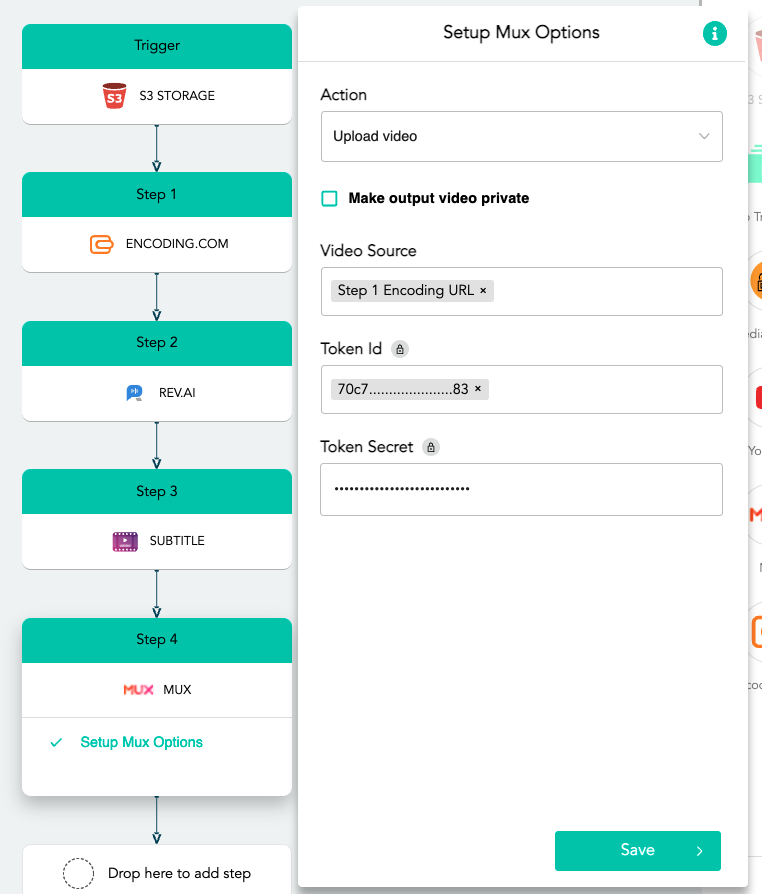
Because the Asset ID takes the Step 4 Asset ID, the subtitles will automatically be associated with the same video file after they both land in Mux.
Now that the workflow is all constructed, we can switch itOn to enable it, upload our asset into S3, and voilà! The whole flow runs as the camera files are uploaded.
This is all pretty powerful stuff, gluing together assorted APIs to transcode video, transcribe audio, and plop it into a review app for a producer. In the future, I plan to flesh out more of what it would take to build the front end via Bubble and Mux, but for now, this is just a walkthrough to inspire creativity about what’s possible.
In future posts, we’ll also walk through how to add in additional steps, to leverage the encoding.com API to transcode to proxy formats and a Transfer to Storage step, so that editing proxies are easily available for editors to download.